
I absolutely love to craft! To take nothing and turn it into something amazing or take something old and turn it into something new again is such a rewarding feeling.
I don't need a season or reason to craft, either. Any day is a great day to put your creative thinking cap on and make something new. I love to get inspiration from others as well.
I have joined a few crafting groups on social media. Seeing the crafts that others are making from all over the United States has been very motivational. The fellow crafters are always willing to help with questions or send you a video of how they made their craft.
It inspired me to share a craft with you! I wanted to pick something with supplies that are easy to find, and easy to complete. Whether its leaves, pumpkins, or candy corn, this time of year has me seeing so much orange!
Now don't get me wrong, I love a good orange pumpkin, but I also like a little color. Colored pumpkins can be hard to find sometimes, so I decided to make them myself.
Supplies:
-- Fake pumpkins of various sizes. (I bought an orange foam pumpkin from a local dollar store and accidently dropped it resulting in a chunk missing. That made this pumpkin perfect for this project!)
-- Piece of material measured and cut to fit your pumpkin. (I already had some material on hand, but you can get material from any craft store, dollar store, or even use a kitchen towel.)
-- Hot Glue Gun
-- Scissors
-- Embellishments: Twine or ribbon, stick from outside, and floral leaves
Instructions:
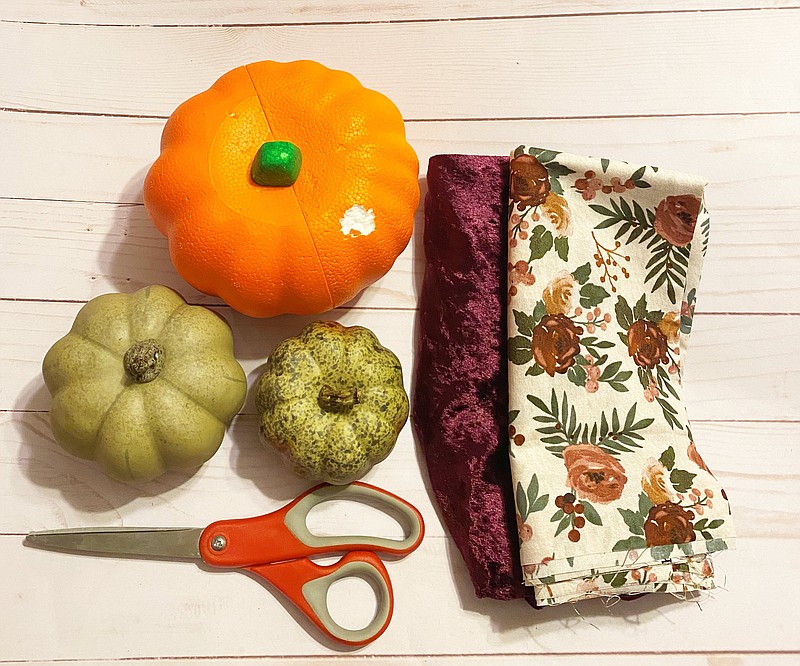
First, you want to collect all your supplies.
(Image 1) Next, you need to measure and cut your material. You can estimate the size you need by putting the corner of the material to the center of the pumpkin. I did that all the way around the pumpkin and just cut off the excess. I used an 8 inch by 8 inch piece of material for the bigger pumpkin and 6 inch by 6 inch for the smaller one.
(Image 2) Once you have your material cut, you may need to cut out some of the pumpkin in the center with your scissors so that you have room to stuff the material inside. The foam pumpkin I had was hollow, so cutting that was simple. The smaller one was not hollow, so I had to cut a good amount out of the pumpkin so that the material could fit. Once you have cut that out of the center, it is time to cover your pumpkin with material.
(Image 3) Just as I did when I measured the pumpkin, I took the corner of the material and put it on the center of the pumpkin. I used my scissors to put the material inside the whole I created. Be sure that you are careful with those scissors! You also want to be sure that your material is covering as you go to the next corner of material and repeat the step. Once you have all the material to the center of the pumpkin, take a minute to look over the pumpkin to ensure that all of it is covered. If you have some sides that seem like the material will not stay in place, use the hot glue to glue it in place. After you are satisfied with how the material is covering the pumpkin, it is time to put on the embellishments. This is where you can really get creative. I used twine to make a bow and some floral leaves that I already had on hand.
(Image 4) First put the leaf on the pumpkin using hot glue to keep it in place. Then, I used the hot glue to put the stem back on the pumpkin. I used the leaf before the stem because I wanted to cover some of the material in the center of the pumpkin.
(Image 5) Lastly, I put my twine bow in place using hot glue. Be careful with the hot glue!
(Image 6) The finished product is so cute and perfect for an event I have coming up!
I love that this project can be so versatile. You have the freedom to pick any patterned material to match whatever look you are going for. It is so simple to do with your kids or grandkids. Plus, it is affordable! If you get your pumpkin, twine, and floral leaves from a local dollar store and the material from the fabric section at Walmart then you could spend around $5 or less per pumpkin.
Happy crafting!


